
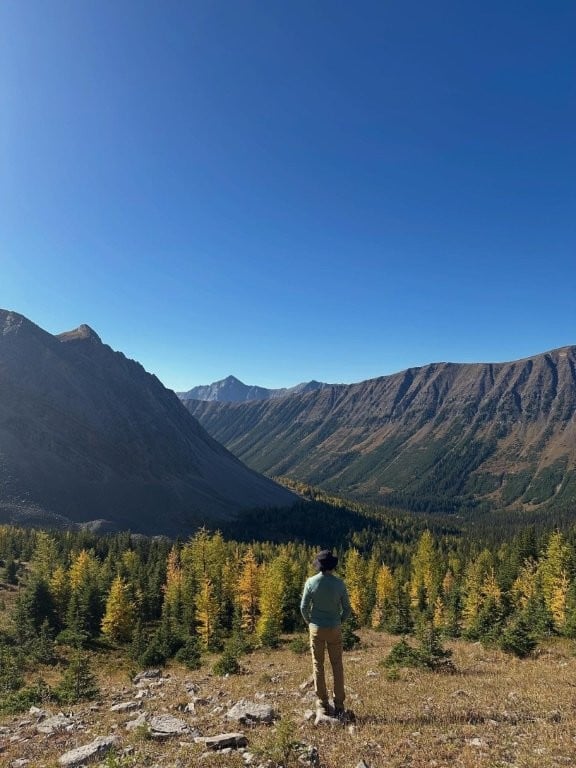
Canmore is a true hiking wonderland. Located in the Canadian Rocky Mountains, just east of Banff National Park, there are literally dozens of terrific Canmore hikes, with spectacular options in Kananaskis Country that are often quieter and more convenient than those of its much more famous neighbour.
And, of course, the many trails available around Banff, Lake Louise and in Yoho National Park are easily reached from Canmore, making it an exceptional base for your adventures in the Rockies. In general, Canmore is more central, more affordable and less touristy than Banff. It is brimming with outdoor activities and other things to do and is always our first stop on our annual summer visit to the mountains. We have also spent some longer stretches in Canmore as part of our “slow travel destinations

Our site includes affiliate links to products we recommend. If you use one to make a purchase, we earn a small commission at no extra cost to you. Thanks for your support!
These days almost all of our trips are built around hiking or long-distance trekking so walking for hours every day was really nothing new, although most Canmore hikes do offer a few notable differences to, say, hiking the European Alps.
While the trails are generally well-maintained, virtually trash-free and well-marked, much like Europe, the big difference is that almost every Canmore hike is located right in the middle of grizzly bear habitat. Hey, it’s just how we do things in Canada. Bear spray canisters in quick draw holsters are as common in the Rockies as Glock 19’s in a Texas Chick-Fil-A.

Of course, I don’t say that to alarm you. It is always important to be prepared and understand grizzly etiquette when hiking in the Rockies but, overall, sightings are rare. And whenever bears are particularly prevalent in a certain area the park officials will close the trail until it is safe to return.
Beyond that, if you are new to hiking in Canada, you will probably be pleasantly surprised to find that most hikers are extremely polite, always walking on the correct side of the path (the right, because that’s the side we drive on), happy to let faster hikers pass and always eager to stand aside to allow approaching hikers room on narrow trails. Trail etiquette is not exactly unique to Canada but, in our experience, we take it a bit more seriously than most.
Anyway, just doing some rough calculations, over several visits over the past few years, we have done around 30 Canmore hikes covering around 300 km and close to 15,000 metres of elevation gain. And that doesn’t even include all the short walks in and around Canmore itself, not to mention the treks to and from the pubs every night.
So, considering how many great Canmore hikes there are to choose from, narrowing this list down wasn’t exactly easy. And if you have lots of time this list will only be a starting point. But these are the trails within easy reach of Canmore that stand out the most for us.

For even more info on the area and Canmore hiking options, check out our other posts:
Best Easy Hikes Near Canmore includes popular hikes such as the Grassi Lakes Trail, Bowe River, Grotto Canyon and Policeman’s Creek Trail.
Larch enthusiasts, or “larch lurkers” as Laynni refers to them (and herself) will definitely want to check out our list of the Best Larch Hikes Near Canmore.
Finally, anyone who loves a great reflection, be it of looming mountains in a calm, clear alpine lake or just in the mirror right after a particularly masterful shave, might be interested in this list of Best Canmore Photo Spots.
The 13 Best Canmore Hikes
Now, on to our very subjective list of best Canmore hikes. Links are to trail details and GPS files on the AllTrails app. We usually use Wikiloc in Europe but find that AllTrails is much better and more extensively used in North America. You get almost all the features of the app with just the free version but will need to pay for the Pro version if you want to download trails for offline use (handy in the mountains).
These trails aren’t necessarily located right at Canmore but they are all easily accessible for a day hike.
Lake O’Hara Alpine Circuit
12 km / 6 hrs / 880m
https://www.alltrails.com/trail/canada/british-columbia/lake-ohara-alpine-circuit

Gaining access to the phenomenal area around Lake O’Hara isn’t easy, but if you manage it you’ll get to enjoy some of the best hiking and scenery in all of Canada. Only a very small number of people are allowed in each day, allowing it to remain pristine and beautiful.
However, if you manage to get a campsite or a spot on the day shuttle you are in for a serious treat. There are many different trails that can be combined into dozens of variations to fit any timeline and fitness level but the Lake O’Hara Alpine Circuit hits the most highlights in a manageable day hike. It is definitely a strenuous challenge but you are rewarded with some of the most diverse and spectacular scenery of any day hike in Canada (or perhaps the world…).
Lake O’Hara: Your Complete Hiking and Camping Guide

While the circuit can be done in either direction, most start along the north side of Lake O’Hara before climbing steeply up to the Wiwaxy Gap, at 2,550 metres the highest point on the hike (and right off the bat, too). Rrom about halfway up you are above the treeline until the very end of the hike and it goes without saying that the views are terrific the whole time so I’ll just point out the real standouts.
We have managed to get there 3 times in total, but the first time there was a bit of smoke haze and the second, some clouds. The third time, though, was, as they say, just right!

From Wiwaxy Gap (with views in both directions) you head down the Huber Ledges (great views) to Lake Oesa (great views and swimming, if you don’t mind freezing your…stuff…off). This is a good place for a break before tackling Yukness Ledges (obviously great views) that you follow all the way around a steep cliff to Opabin Plateau, which features a bunch of little lakes and the fantastic Opabin Prospect viewpoint (although this involves a detour from the main route).

Then it’s back up, this time on the All Souls’ Route, which traverses a barren, rocky slope with a gradual climb to All Souls’ Prospect, our choice for best viewpoint in the entire Lake O’Hara region. Mind you, the scenery is similar all the way up and constantly changing so you could really pick anywhere along there.

Unfortunately, getting down the other side isn’t ideal, and if you have problems scrambling down rocks and descending on loose, slippery paths we would suggest hiking the route counterclockwise. That is what we have done both our second and third visits, so that we climb UP the rocky scramble to All Souls Prospect, instead of down, which we personally find more difficult.

However, continuing in the normal direction, once you reach Schaffer Lake at the bottom, the tough work is done and you can choose between the Big Larches route and the Alpine Meadows route to make your way back down to the lake and some well-deserved snacks/drinks/carrot cake at Le Relais shelter.
Really, just amazing from start to finish. But don’t underestimate the difficulty since in addition to a lot of elevation gain, the terrain is difficult in spots. Check out our guide to see how you can get a coveted spot at Lake O’Hara and if you manage it, get ready for one of the most memorable hiking experiences in the Rockies.


Smutwood Peak
20 km / 7 hrs / 950m
https://www.alltrails.com/trail/canada/alberta/mount-smutwood

It was, and is, a really tough call between this one and #3 on the list – Tent Ridge – for our choice as the second-best Canmore hike. I’m going to give it to Smutwood, located in the Spray Valley Provincial Park, in a photo finish.
Mainly because it actually is a difficult decision even though we had absolutely ideal weather on Tent Ridge but a cold, windy and occasionally rainy day on Smutwood. I have to think that if the conditions were reversed then Smutwood Peak would be the clear choice (so to speak).

The first 6 kilometres of this hike are very easy, just a slight incline through the trees and, eventually, a long, picturesque meadow split by a classically babbling brook. Then, after about an hour and a half, you reach the end of the valley and the real work begins.
You climb steeply up to a false summit, then up a bit more to a pass with great views of the mountain-lined valley behind and your first look at one of the Birdwood Lakes and looming Mount Smuts (which is another hike altogether).

From there, you follow a narrow, rocky trail around and past the second lake to a grassy ridge with terrific views of both lakes, all the mountains to the west (there are a lot) and the steep, narrow and rocky ridge you still have to climb to reach the top.
Luckily, even though that last bit looks daunting, and can occasionally be a bit scrambly, there are no parts that feel actually dangerous. And the scenery just gets better and better the higher you go, in all directions. It’s pretty fantastic.

But, if you or any of your group don’t like heights or narrow trails or slippery sections, etc. even stopping on the back side of the lakes is well worth the time and effort it takes to get there.
In fact, this hike was so good we decided to dedicate an entire post to the planning details:


Tent Ridge Horseshoe
11 km / 5 hrs / 850m
https://www.alltrails.com/trail/canada/alberta/tent-ridge-horseshoe

Before we did Smutwood, this was the best hike we had done in Canmore and, honestly, one of the best day hikes we’ve done anywhere in the world. Another amazing Kananaskis hike. After about an hour of easy climbing through the trees, you emerge into a valley surrounded on three sides by Tent Ridge. Now all you have to do is get up there.
We hiked it clockwise, which we preferred because it meant we were going up on the steepest part that has a few scramble spots with ‘exposure’ – the polite way to say spots with steep drop-offs that would be a serious issue if you make a mistake – instead of climbing down it, which I think would increase the Tent Ridge hike difficulty.

Once you reach the ridge, though, wow! The entire horseshoe is visible from then on, along with several mountains in behind (including Mount Smuts – these two hikes are very close to each other), an amazing forested valley with lakes and more peaks to the west, and the picturesque Spray Lakes off to the north that you passed on the way down from Canmore.
Of course, the whole experience was certainly helped by the fact that we hiked it on possibly the best day of the entire fall (year?) – about 15C, not a cloud in the sky or breath of wind to distract us on the occasionally treacherous climb up to the ridge.

Yes, it definitely does have some trickier spots to be negotiated. Once again, if you don’t like heights or aren’t confident doing some climbing and scrambling up a rocky slope then this probably isn’t the hike for you.
After the initial stretch getting up to the ridge (going clockwise) there really aren’t any more difficult spots, just up and down all the way around to the far corner. At the end of the horseshoe, after spending a few more minutes enjoying the last of the high views, you start down on a fairly steep set of slippery switchbacks, but at least ones that you will not have to use your hands to get down.

After that you continue down, down, down through the trees back to the trailhead.
All in all, phenomenal, but I wouldn’t want to try it in strong winds and definitely not in the rain or snow, so try to plan your visit around the weather. Read here for more detail on the Tent Ridge Horseshoe hike.

Pocaterra Ridge
10 km / 5 hrs / 700m gain / 1000m loss
https://www.alltrails.com/trail/canada/alberta/pocaterra-ridge

Pocaterra is a difficult but fantastic hike that also makes our list of Best Larch Hikes, as it also features some amazing stands of larch trees. However, the difficulty and the fact it is best done as a point to point hike with 2 vehicles mean it doesn’t work for everyone. It involves steep slopes on either end of the ridge and some tricky ups and downs as you navigate the top of the long, winding ridge.
The views are stunning, though, and well worth the effort. Mountains in all directions, plus forested valleys, distant lakes and the captivating snake-like visage of the ridge itself are all impressive.

And even if you aren’t up for a challenging (but epic) 5-hour hike up, over and along a sometimes sketchy ridge, the best section of larches can actually be reached with far less effort. It takes only an hour to reach the best larch area in a lush valley below the ridge itself (and surrounded by other peaks). So if you are more interested in the beautiful larches and less in the panoramic views found at the top, you can shorten it to a lovely, relaxed 2-hour stroll.

The Pocaterra Ridge trail starts from the same large parking lot as Ptarmigan Cirque but isn’t nearly as busy, another benefit of heading that way. The ideal way to hike it is from south to north, leaving a second vehicle in the Little Highwood Pass parking lot. The northern end is roughly 300m lower than the south end so, while doing it from north to south is also an option, you’ll be making it even harder than it already is.

If you don’t have someone available to work the vehicle shuttle, you can also just show up at the Little Highwood lot and try to hitch a ride. Almost everyone who shows up is there for Pocaterra so they are well aware of why you need a lift.
Devil’s Thumb and Little Beehive
15 km / 5 hrs / 1,000m
https://www.alltrails.com/trail/canada/alberta/devils-thumb-via-lake-agnes-trail
https://www.alltrails.com/trail/canada/alberta/little-beehive-via-lake-agnes-trail

This hike starts at Lake Louise and there are several variations you can choose. We went twice and of the two routes we hiked, this was the more spectacular, although they both had their highlights (the other appears further down this list). Plus, Laynni kept getting mixed up and calling it the Devil’s Knob, which was also fun in its own way.
From the Fairmont hotel you head around the north side of the lake and follow the trail up to Lake Agnes. The 3 km trail to this quaint little teahouse is very popular and only involves a moderate climb. Along the way you’ll get a couple glimpses of the luminescent blue of Lake Louise below, although not as often or as much as you might expect.

Lake Agnes is a pretty little lake surrounded by steep hills and, in season, bright yellow larches. Even if you aren’t going to climb up to the Devil’s Thumb or Big Beehive it is worth walking around to see the lake from the other side.
Looking up from the teahouse, the Beehive is obvious to the left and the Devil’s Thumb is the tall pointy rock just off the end of the lake. Getting to both involves climbing the switchbacks at the far end of the lake. Once you reach the pass you can take a left to the end of Big Beehive (only about a 5-minute walk) or you can go to the right to Devil’s Thumb (unsigned).
There is a large log across the trail but don’t let that deter you, continue on and the trail is fairly clear, and there are even small, coloured ribbons occasionally to show you the way.

There is a little bit of scrambling, then a steep, slippery section but there are trees to grab if need be, then some easy rock scrambling at the very top. Then a stunning view of Lake Agnes, Lake Louise and the entire Bow Valley laid out in front of you. Well worth the extra effort.
After backtracking down to the Lake Agnes teahouse we added on an extra 2 km or so out to the Little Beehive viewpoint. Very nice in its own right, although a bit anticlimactic after the Devil’s Thumb.
Iceline via Celeste Lake (including Takkakaw Falls)
18km / 6 hrs / 950m
https://www.alltrails.com/trail/canada/british-columbia/celeste-lake-via-iceline-trail

I’ve actually done this hike twice, that’s how much I liked it. It offers far more diversity than you will find on almost any other trail in the area. Incredible views, of course, from the Iceline Ridge. Mountains looming behind, passing alpine lakes along the way, the entire valley to the east backed by yet more mountains and even a good look at Takkakaw Falls from a distance.
On the way down (or up) you’ll hit clear, placid Celeste Lake, spend some time in the trees, then get up close to Laughing Falls and follow the river back to Takkakaw Falls, the second highest in Canada. It is pretty special to have all these different highlights included in a single hike.

I hiked it clockwise the first time – steep climb to start, getting above the treeline and onto the ridge sooner but with a long, occasionally tedious final 6-7 kilometres down through the trees and past the waterfalls.
Going counterclockwise lets you get started with a long, gradual incline, slowly building to the best parts (Celeste Lake and the ridge). It means going down the steep part at the end so those whose knees dislike that sort of thing might want to go clockwise, although it isn’t slippery or anything like that.

There are also a number of possible add-ons to this hike, including to Yoho Lake or Stanley Mitchell hut, which makes it a very popular area for overnight backpacking trips.


Moraine Lake – Sentinel Pass and Eiffel Lake
19 km / 5.5 hrs / 1,000m
https://www.alltrails.com/trail/canada/alberta/sentinel-pass-trail
https://www.alltrails.com/trail/canada/alberta/larch-valley-trail-to-eiffel-lake-trail

Moraine Lake is famously one of the most beautiful lakes in the country, which is why it is such a tricky place to visit. As it continued to become more and more popular each year, finally Parks Canada decided they had to restrict access. Starting in 2023, it is no longer possible to drive your own vehicle to Moraine Lake. All visitors now need to book a spot on the Park and Ride Shuttle through the Parks Canada reservation service.
While this will undoubtedly reduce overcrowding and be great for the park, the first shuttle doesn’t leave Lake Louise until 6 am which, unfortunately, will not be early enough to get there in time for sunrise. Watching the sun come up from “The Rockpile” has always been one of the iconic experiences in the Rockies. However, whatever time of day you arrive, Moraine Lake is a gorgeous place with several outstanding trails to enjoy.

The hike to Sentinal Pass starts with a pretty gradual, easy climb to Larch Valley (stunning in late September larch season, although presumably still pretty nice any time of year), at which point the trail flattens out for a while at the pretty Minnestimma Lakes, with Sentinel Pass looming in the background.
Many people stop at the lakes but we would highly recommend tackling the final ascent to the pass. It looks daunting but is really pretty gradual on several long switchbacks, and the view from pass – in both directions – is amazing.

There was even some interesting wildlife on display, although there’s no guarantee your lunch will also be interrupted by a weasel running by with a dead pika in its mouth, so I’d hate to make any promises.
If all this already seems like a full day you can certainly head straight back down, but if you have any energy left, about half an hour from the bottom you can veer off to the west and check out Eiffel Lake. This trail – a smooth, easy incline – was also a larch wonderland and the scenery of the lake and surrounding ridges at the end of the valley are well worth the extra effort.

The sun was continually coming and going through the clouds, although the whole time we watched, and waited, and watched, and waited, the light never… quite… made… it onto Eiffel Lake, skirting all the way around it like repelled by a vortex of evil. Or just random chance. Either way, it was pretty weird.

Wind Ridge
12 km / 5 hrs / 880m gain
8 km / 2.5 hrs / 250m gain just to Windy Viewpoint
https://www.alltrails.com/explore/trail/canada/alberta/wind-ridge-trail

This fantastic option that starts out in Dead Man’s Flats just east of Canmore is really a tale of two hikes. Which makes it ideal for a wide range of hikers, with one option being strenuous and tricky in spots but a much simpler option still offering up a terrific viewpoint.
The first hour involves 4 bridge crossings and a gentle uphill through the trees – no views but easy and pleasant. Then suddenly you emerge from the trees at Windy Viewpoint – a magnificent panorama that takes in the valley, Wind Ridge itself (potentially your destination) and several peaks, including Peter Lougheed, Windtower, Rimwall, Rimwall W2 and The Orphan.

It is a pretty insane view considering how little effort it takes to reach and the fact it can be accomplished by any reasonably mobile hiker. Even if this is as far as you’re planning to go, it is worth pushing on another 10 minutes up the now fairly steep hill, just to get a slightly better angle. Then take a break and enjoy the view, you’ve earned it.
However, for those tackling the ridge itself the hard work is just starting. The trail follows the side of hill for a bit, lulling you somewhat, before you reach a rock outcropping that involves some scrambling to pass. You can tackle the direct route up and over the rocks themselves – not quite as hard as it looks but still challenging. Or you can go around the long way – it only adds about 5 minutes and although there is still some scrambling involved, it is mostly in the trees where you have branched to help pull yourself up.
Soon after this section you begin climbing up to the ridge itself (watch for all the lazy, unconcerned marmots) on a very steep (and occasionally slippery) slope. Exhausting, but worth it once you finally reach the ridge, where the views get even better and the trail becomes a pleasant undulating path leading to the panoramic endpoint.

From the ridge you are now treated to a very unique and cheeky view of the backsides of the famous Three Sisters mountains, along with even better vantage points of all the previously mentioned peaks. Here the official trail ends, although it is possible to continue along the ridge – way down and way back up – all the way to The Orphan itself. I didn’t try this variant but I expect it would add about an hour each way (and considerably more elevation gain/loss).
Unlike many of the other top ridge hikes around Canmore, Wind Ridge is not so well known and even on a sunny weekday in August, I saw just 9 other hikers make it all the way to the top and a handful more that stopped at Windy Viewpoint. Hiking poles aren’t stricly necessary to and from Windy Viewpoint but could come in quite handy for the higher trail.
Eohippus Lake
25km / 8 hrs / 850m gain
22 km / 7 hrs / 650m from Sunshine Meadows if the gondola is running
https://www.alltrails.com/trail/canada/alberta/eohippus-lake

We were led on this hike by Walter and Sybille, friends from Calgary who have hiked the area extensively. Which was lucky because, although there are some popular hikes in the same area as Eohippus Lake, very few people venture onto this particular variation.
In fact, after splitting off the main Healy Pass trail, we only saw one other hiker all day. Who just happened to be a solo man with a baby strapped to his chest fast asleep and sucking on his dad’s thumb. Bizarre might be too strong a word but, seriously, of all the people to be the only other person on the trail…?
You start off at Sunshine Village parking lot with 6 pleasantly gradual and shaded uphill kilometres before branching off into some awesome alpine meadows and bright larch forests.

We passed a couple of gorgeous, calm lakes as we walked parallel to the photogenic “Rampart” ridge, then eventually reached extraordinary Eohippus Lake, also gorgeous and calm but also backed by the monstrous “Monarch” peak, with the Ramparts lingering off to the side. We spent an hour there with the place all to ourselves. It was pretty cool, I have to say.
This is one of the longest hikes we have done around Canmore but at least that means that the 850m of elevation gain was very gradual and, overall, the hike did not feel very difficult, even though it will take a full day to cover the distance.
Another option is to shorten the hike and turn it into a loop by taking the Sunshine gondola and start the hike from Sunshine Meadows. This reduces the distance by about 3 km and the elevation gain by 200m and you can return on the regular trail to make it a partial loop.
Wasootch Ridge
13 km / 4-7 hrs / 930m
https://www.alltrails.com/explore/trail/canada/alberta/wasootch-creek

Wasootch Ridge is a fantastic hike along a – you guessed it – steep ridge with amazing views in all directions. The best part is that there are 7 different peaks and you can hike to as many as you want. The stats listed above are to make it all the way to Peak 7, although most people don’t actually make it all the way (including us).
The Wasootch Ridge trail deteriorates quite quickly toward the end and the last stretch involves some rather sketchy scrambling. Certainly manageable for experienced hikers but not necessarily recommended for everyone or in adverse conditions such as rain or strong winds.
However, if you choose to stop at any of the earlier peaks you can avoid this complication and shave off some of the length and elevation gain as well. Because it features multiple “peaks”, it is fairly simple to customize it to whatever length you choose. Wasootch Peak is generally considered “Peak 7”, but each of the peaks from #3 to #6 offer rewarding views and logical stopping points if you don’t have the time or energy to complete the entire distance.

Both Wasootch Ridge and Wasootch Creek are very popular Kananaskis hikes and when we arrived at 9 am on a Saturday in July the parking lot was already half full. Although we only saw 7 people on our way up and another 8 on our way down so it seems that the much flatter and easier Wasootch Creek hike is the busier of the two.
For a full breakdown, check out our guide to the Wasootch Ridge Hike

Lake Louise – Lake Agnes to Big Beehive to Plain of Six Glaciers Teahouse
19 km / 7 hrs / 1,000m

This route is all intertwined with hike #3 to the Devil’s Thumb and Little Beehive. You follow the same route up to Lake Agnes, circle it and climb the switchbacks again then, at the top, you go left to the end of Big Beehive for tremendous views of Lake Louise.
If you follow the trail down and around at the end for 5 minutes you can also get a bird’s eye look at Lake Agnes. Both are great, you just can’t see both lakes at the same time like you can from the Devil’s Thumb.

In this version, instead of returning to Lake Agnes, we headed down the other side of the pass, eventually meeting up with the trail up the valley to the Plain of Six Glaciers and the eponymous teahouse (where they also serve soup and sandwiches) waiting at the end.
Heed the prominent signs threatening a $500 fine for not using the bathroom. We took this to mean you’d be fined if you went to the bathroom anywhere but the bathroom, not that you were legally obligated to use the very nice outhouse they had went to all the trouble of building, but it wasn’t entirely clear.

It is a beautiful walk and the teahouse is in a great location, but if you still have more left in your legs you can add another 1.5 km each way to an additional viewpoint at the very end of the valley.
All through this area we were treated to loud, spectacular avalanches on the mountains across the valley, although I can’t say how common this really is. If it was a daily occurrence you wouldn’t really think there’d be any snow left but then again, I’m not exactly an avalanche expert, so who can say?

From there it is a nice easy 6 km walk back down to the beginning of Lake Louise – although once you reach the paved lakeside portion of the trail you’ll notice a pretty major shift in demographic, from backpacks and hiking poles to dogs, babies and the elderly. Culture shock, mountain style. We wrote a full guide to the Big Beehive Hike since it’s one of our favourite viewpoints on Lake Louise.
Rawson Lake to Sarrail Ridge
11km / 4 hrs / 800m (AllTrails shows too much gain)
https://www.alltrails.com/trail/canada/alberta/sarrail-ridge-via-rawson-lake-trail
This one appears in both our Canmore “best hikes” and “best easy hikes” lists, since the hike up to Rawson Lake is pretty easy but those determined to get the absolute best view on offer can continue on around and way up to the top of Sarrail Ridge.

While this flexibility probably contributes somewhat to its popularity, most people consider it a must-see for its amazing beauty anyway. Located in a sheltered bowl, Rawson Lake is typically very calm and delightfully reflective.
There are also some larches around to add to the fun in the fall. Increasing its allure is the fact the trail starts at Upper Kananaskis Lake, which is no slouch itself and is a big favourite of canoers and kayakers. Unfortunately, during our latest visit the smoke from the American wildfires was restricting the grandest of the views but, as usual, the reflections were still pretty outstanding.

Arethusa Cirque
4.5 km / 2 hrs / 380m
https://www.alltrails.com/trail/canada/alberta/arethusa-cirque-route
In the same area as Ptarmigan Cirque, it is similar trail in that you start hiking up through the trees and a loop around the cirque at the end. However, Arethusa is a little tougher because the trail is not well-maintained, there are a couple very steep parts and you have to cross a boulder field at one point. However, it is still less than 5 km in total so it’s a shorter larch hike option.
It’s a good idea to do the trail clockwise so that you go up the steepest parts of the trail. It’s a fairly quick hike for the mountain and larch views you get. Keep an eye out for the fossils in the rocks and the resident herd of mountain sheep that often hang out in the meadow near the top.
Map of Best Canmore Hikes
Click the star to save this map to your Google Maps – then find it under Saved/Maps (mobile) or Your Places/Maps (desktop)
Kananaskis Conservation Pass
Every vehicle parking at trailheads in Kananaskis Country or the Bow Valley Corridor needs to purchase a Kananaskis Conservation Pass (with a few specific exceptions). The passes cost $15/day per vehicle or you can get an annual pass for $90 that covers 2 vehicles. Of course, this only covers the Canmore hikes in Kananaskis – for the hikes the national parks you will need to purchase a Parks Canada pass.
Honourable Mention
Another very scenic hike with optioins for distance and difficulty is the Elbow Lake hike, continuing up the valley to Rae Glacier. With a small glacier at the top, phenomenal views back down and the wonderfully clear and photogenic Elbow Lake is great for both campers and day trippers, this hike is under serious consideration to be added to this list.
The hike to Pickle Jar Lakes is a nice moderate 11 km journey along a ridge to – you guessed it – several lakes. Some are reflective, some are rocky, all are pretty scenic. Not the most spectacular hike in the area but a great place to get away from the crowds.
So, those are the best hikes in the Canmore area that we can personally vouch for, although we certainly heard and read about many more that remain on the list for our next visit. Among those that sound worth checking out:
King’s Creek Ridge
Mount Lady MacDonald
Burstall Pass
East End of Rundle
Piper Pass
Ha Ling Peak Hike
Heart Mountain Trail
Mount Lady MacDonald
Plus, if you are coming from the east (or heading that way) you may want to check out:
7 Amazing Drumheller Hiking Trails
Where to Stay in Canmore
We often camp at the Bow River Campground just outside of Canmore, but if you’re looking for more comfort we have also stayed at the Canadian Rockies Chalets and it was excellent – well-equipped, roomy and walking distance to grocery stores and downtown. A couple other good choices are Base Camp Chalets (next door) and the Lamphouse Inn, which is right downtown.
Mount Kidd RV Park is one of the best campgrounds in the Rockies and definitely worth a few nights sleeping under the looming Mount Kidd very close to many of the hikes on this list.
Meanwhile, for some completely different scenery, check out: The Best and Worst of Drumheller Camping
Trip Planning Resources
Here is a list of the most important resources we use when planning our travels, all in one convenient spot. Full disclosure, when you use any of these links to reserve or sign up for something, we receive a small commission which is greatly appreciated. However, your price does not change and we have only included products and websites that we can honestly recommend.
- We book the majority of our hotels on Booking.com. With frequent stay discounts, thousands of reviews and free cancellation, it is very rare for us to have a bad hotel experience these days.
- Wise is by far the best international multicurrency bank account we’ve found. We can now send and receive money in half a dozen different currencies, convert to dozens more with no exchange premium and pay or withdraw local currencies. Highly recommended.
- When travelling we always get SIM cards with data for our phones. Local SIM cards are sometimes a bit cheaper but if you have a relatively new smartphone (iPhone XR or newer, Samsung S20 or newer) you can just buy an eSIM online, get a QR code by email and you’re good to go. After extensive research we have found that Nomad eSIMs usually have the best coverage and prices.
- Google is currently transitioning to an AI-only model and are now actively suppressing private websites. In most cases, they don’t even share attribution links to show where they got their information. Legal theft, apparently, which is terrible for travel blogs, as well as people who actually use travel blogs for trip research (i.e. us) rather than just hoping the latest AI mashup is somewhat accurate. Anyway, the point is, if you still want to read firsthand travel information, we recommend using DuckDuckGo as your search engine. You might even find some delightful Routinely Nomadic posts ranking high in those results.
- If you’re interested in local guided tours, including everything from city tours to cooking lessons to adventure activities, check out the huge range of options at Get Your Guide.
Summary
With so many incredible Canmore hikes to choose from, making a best of list is certainly not easy. But we are thankful that our home base is within a long day’s drive of this fabulous area, allowing us to keep checking more Rockies hikes off our list every summer.
Depending on my mood on any given day, the order of these hikes could easily be different but they are all good enough that I would hike them again in a heartbeat. Decisions, decisions.
Pin it for later!

Other Posts You Might Like:
The Best Easy Hikes Near Canmore
The Best Things to Do in Canmore
Johnston Canyon Hike: How to Visit
Elbow Lake and Rae Glacier Hike
Floe Lake – Numa Creek Loop: An Epic Backcountry Adventure
Jasper National Park: Reasons to Visit
Berg Lake: A Spectacular Rockies Adventure
The Most Beautiful Lakes in the World
Drumheller: A Guide to the Badlands
Mulagljufur Canyon: One of the Best Day Hikes in Iceland
Pin it for Later!

About the Author
Dean Johnston

Dean Johnston quit his job as a financial planner in 2008 to travel the world, and has now visited all 7 continents and more than 85 different countries. He wrote his first blog entry in a sweltering internet cafe in Bali in 2000 and has been writing about their travels ever since, including publishing 3 travel books.
As Routinely Nomadic, Dean remains focused on providing informative travel guides, entertaining stories and useful social media content to readers from all over the world.